
I have seen very little troubleshooting information documented on NBN Enterprise Ethernet. As I receive calls regarding provisioning errors most days, I thought I would write up some common mistakes.
NBN Enterprise Ethernet (EE) is a wholesale layer 2 fiber product designed to deliver symmetrical speeds up to 1 Gbps primarily for Enterprise and Government users.
Telstra offers various products over NBN EE, including;
- Business IP (BIP)
- Managed Device
- Connect IP (CIP)
- Telstra Internet Direct over EE (TID)
Troubleshooting Common Issue: Missing Inner VLAN 101 Tag
A common fault that I see is when setting up TID over NBN EE the Inner VLAN 101 tag on the customer router is missing.
The Nokia device isn’t a router, it’s an NTU (layer 2 only) - there is no web access/routing provided via this device. It’s important the configuration on the customers router on site is set to trunking/vlan tagged with 802.1Q and the ID 101.
All configuration has to be set up locally on the customers own router.
In the core network, Telstra have an edge device configured with the lower usable IP of the /30 range the customer has been provided.
This means the customer configures VLAN 101 with the higher usable IP of the /30 with a gateway of the Lower usable IP of the /30. The NTU is L2 and passes the tagged traffic back to the Telstra network (on the far end in the exchange).
Trunk/VLAN Tagged Encapsulation: 802.1Q / Dot1q
VLAN ID: 101 Customer Equipment IP : xxx.xxx.xxx.xxx/30
1. Configuration Steps:
Confirm your equipment (CPE) supports VLANs (802.1Q). Please note that the Telstra V7610 Smart Business Modem doent work on NBN EE.
- Before enabling any other features, configure the Telstra provided Gateway IPv4 address, CPE Static IPv4 address and DNS.
- Configure the Inner 101 VLAN (C-Tag) on your device to establish and test internet connectivity.
- To maintain optimal throughput, configure the upstream shaper/policer on your device. This prevents packet dropouts by the NBN B-NTD (Network Termination Device).
It’s important the configuration on the customers router on site is set to trunking/vlan tagged with 802.1Q and the ID 101.
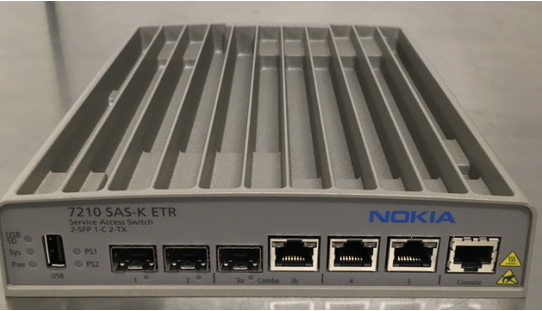
Interfaces & LED's
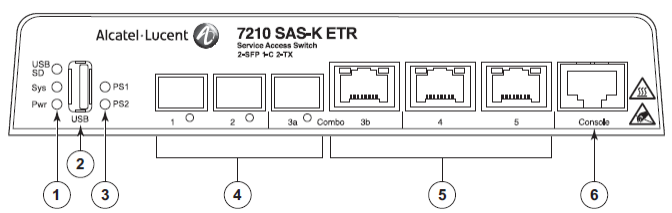
- LEDs: Power, System and USB
- Socket: Flash Drive
- Power: Supply Status
- SFP Interfaces: 100/1000 Ports
- Cooper Interfaces: RJ45 10/100/1000 Ports
- Management Interface: Console Port
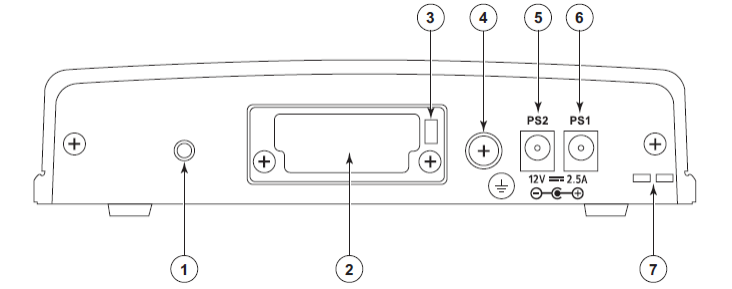
- Secure Device: Threaded hole for securing to rack
- Internal Flash Drive: Access Panel
- Kensington Lock Slot
- Ground Connection: A grounding point for the device
- Power Input: Power Supply 2
- Power Input: Power Supply 1
- Cable Management: Power cable tie down
Power Status LED:
- Green: The power entry module (PEM) is functioning normally.
- Amber: The system is performing internal power checks, and if this condition persists for more than 15 seconds, it indicates a potential issue with the power supply or an internal power failure.
- Off: The power entry module (PEM) has failed or is not connected.
Flash Drive LED (USB SD):
- Green: Indicates that at least one of the USB ports has a valid flash drive connected and it is functioning normally.
- Amber: Indicates that the flash drive connected to one or both USB ports has been removed or has failed.
- Off: Indicates that no flash drive was connected when the system was powered on, or the flash drive contains an invalid boot.tim image.
Power Supply LEDs (PS1 and PS2):
- Green: Indicates that 12Vdc power is present on the respective power entry module (PEM) connection.
- Off: Indicates that the power entry module (PEM) has failed or is not connected.
System LED:
- Green (blinking): The system is in the boot phase.
- Green: The system has completed the boot phase and is running normally.
- Amber: The system is in an alarm state.
100/1000 SFP and 10/100/1000BASE-T Copper Port LED:
- Green: The port has a valid link.
- Green (blinking): Indicates activity on the port.
- Off: The link is down.
Terms and Additional Information
UNI-VLAN Number:
You must decide if you want a Fibre or Copper CPE Interface when ordering the service. You cannot change this once provisioned, you will have to cancel and re-order.
You cannot nominate or request a particular UNI-VLAN number; You will be allocate it.
Upstream Traffic Shaping:
You are responsible for configuring upstream traffic shaping towards Telstra's network to ensure adherence to the purchased speed enforced by the NBN B-NTD.
Why configure upstream shaper?
Configuring an upstream shaper on your router ensures traffic sent towards Telstra's network adheres to the purchased speed, preventing packet drops and ensuring optimal throughput.
MTU (Maximum Transmission Unit):
The MTU supported by the TID Adapt service is 1500. Note that jumbo frames are not supported.
Using Adaptive Network Services:
Telstra recommends shaping each purchased Adaptive Network service (e.g., BIP Adapt, TID Premium Adapt) according to its speed to avoid packet drops and achieve optimal throughput.
Limitation on NBN EE Throughput:
The maximum layer 2 throughput of the NBN NTU is 952 Mbps, limiting the TID Adapt service to this speed.
Traffic Marking for Layer 3 Services:
While traffic entering via the NTD UNI does not require marking, it's recommended to prioritize and mark traffic for layer 3 services like TID Adapt.
Mixing TID Premium Adapt and TID Lite Adapt:
TID Premium Adapt and TID Lite Adapt cannot be used on a single NBN EE Access service due to differences in class of service (CoS).
Dedicated NBN B-NTD Request:
You cannot request a dedicated NBN B-NTD for a NBN EE Access Service. NBN will determine the need for another B-NTD based on existing B-NTD's capacity.
NBN B-NTD: Nokia 7210 SAS-K5:
The NBN B-NTD used is a Nokia 7210 SAS-K5, and it can be installed in an existing customer network communication rack or a wall-mount option.
CPE VLAN Configuration:
Ensure your CPE supports VLANs and configure the WAN interface with C-VLAN (C-tag) - 802.1Q encapsulation (TPID = 0x8100).
CPE WAN Interface Settings:
Set your CPE WAN interface to "full duplex" for Duplex and "Auto-Negotiate" for Interface Speed.
Customer Router Settings:
The Nokia device is an NTU (Layer 2 only) and does not provide web access/routing. Configure your customer router to use VLAN 101 with the higher usable IP of the /30 range provided by Telstra.
Port Configuration on NBN B-NTD:
Connect to the port specified in the Configuration Advice.
Fibre: Port 3 is a "combo port," configured either as Optical (Port 3A) or Copper (Port 3B), but not both.
Cooper: Connect your router/firewall into Port 4 or 5 of the Nokia BTD (NBN Device).
Subscribe to our email newsletter and unlock access to members-only content and exclusive updates.
Comments